Integrating the Chatbot
Putting the chat widget on your website takes a few minutes. You have two paths:
- Use a plugin if your site runs on WordPress, PrestaShop, Joomla or Shopify: one click, no code, the widget is added for you.
- Paste the embed code for any other site (custom HTML, Webflow, Wix, static site, your own framework).
Either way, you set up the widget once in the admin: open your assistant, then go to Assistant → Integrations → Web. Plugins use the same settings.
Path 1 — One-click plugin (recommended for CMS)
If your site uses one of these platforms, skip the embed code — the plugin handles everything:
| Platform | Plugin guide |
|---|---|
| WordPress / WooCommerce | WordPress integration |
| PrestaShop | PrestaShop integration |
| Joomla | Joomla integration |
| Shopify | Shopify integration |
| Webflow | Webflow integration |
The plugin connects your assistant and adds the widget to every page: no template editing, no FTP, no copy-paste. The WordPress, PrestaShop and Joomla plugins show the appearance you set in AI SmartTalk; a setting you change in the plugin applies to that site only.
Path 2 — Embed code (any other site)
The web integration walks you through seven steps. Open the chat preview at any time: it shows every change live, before you deploy anything.
1. Appearance
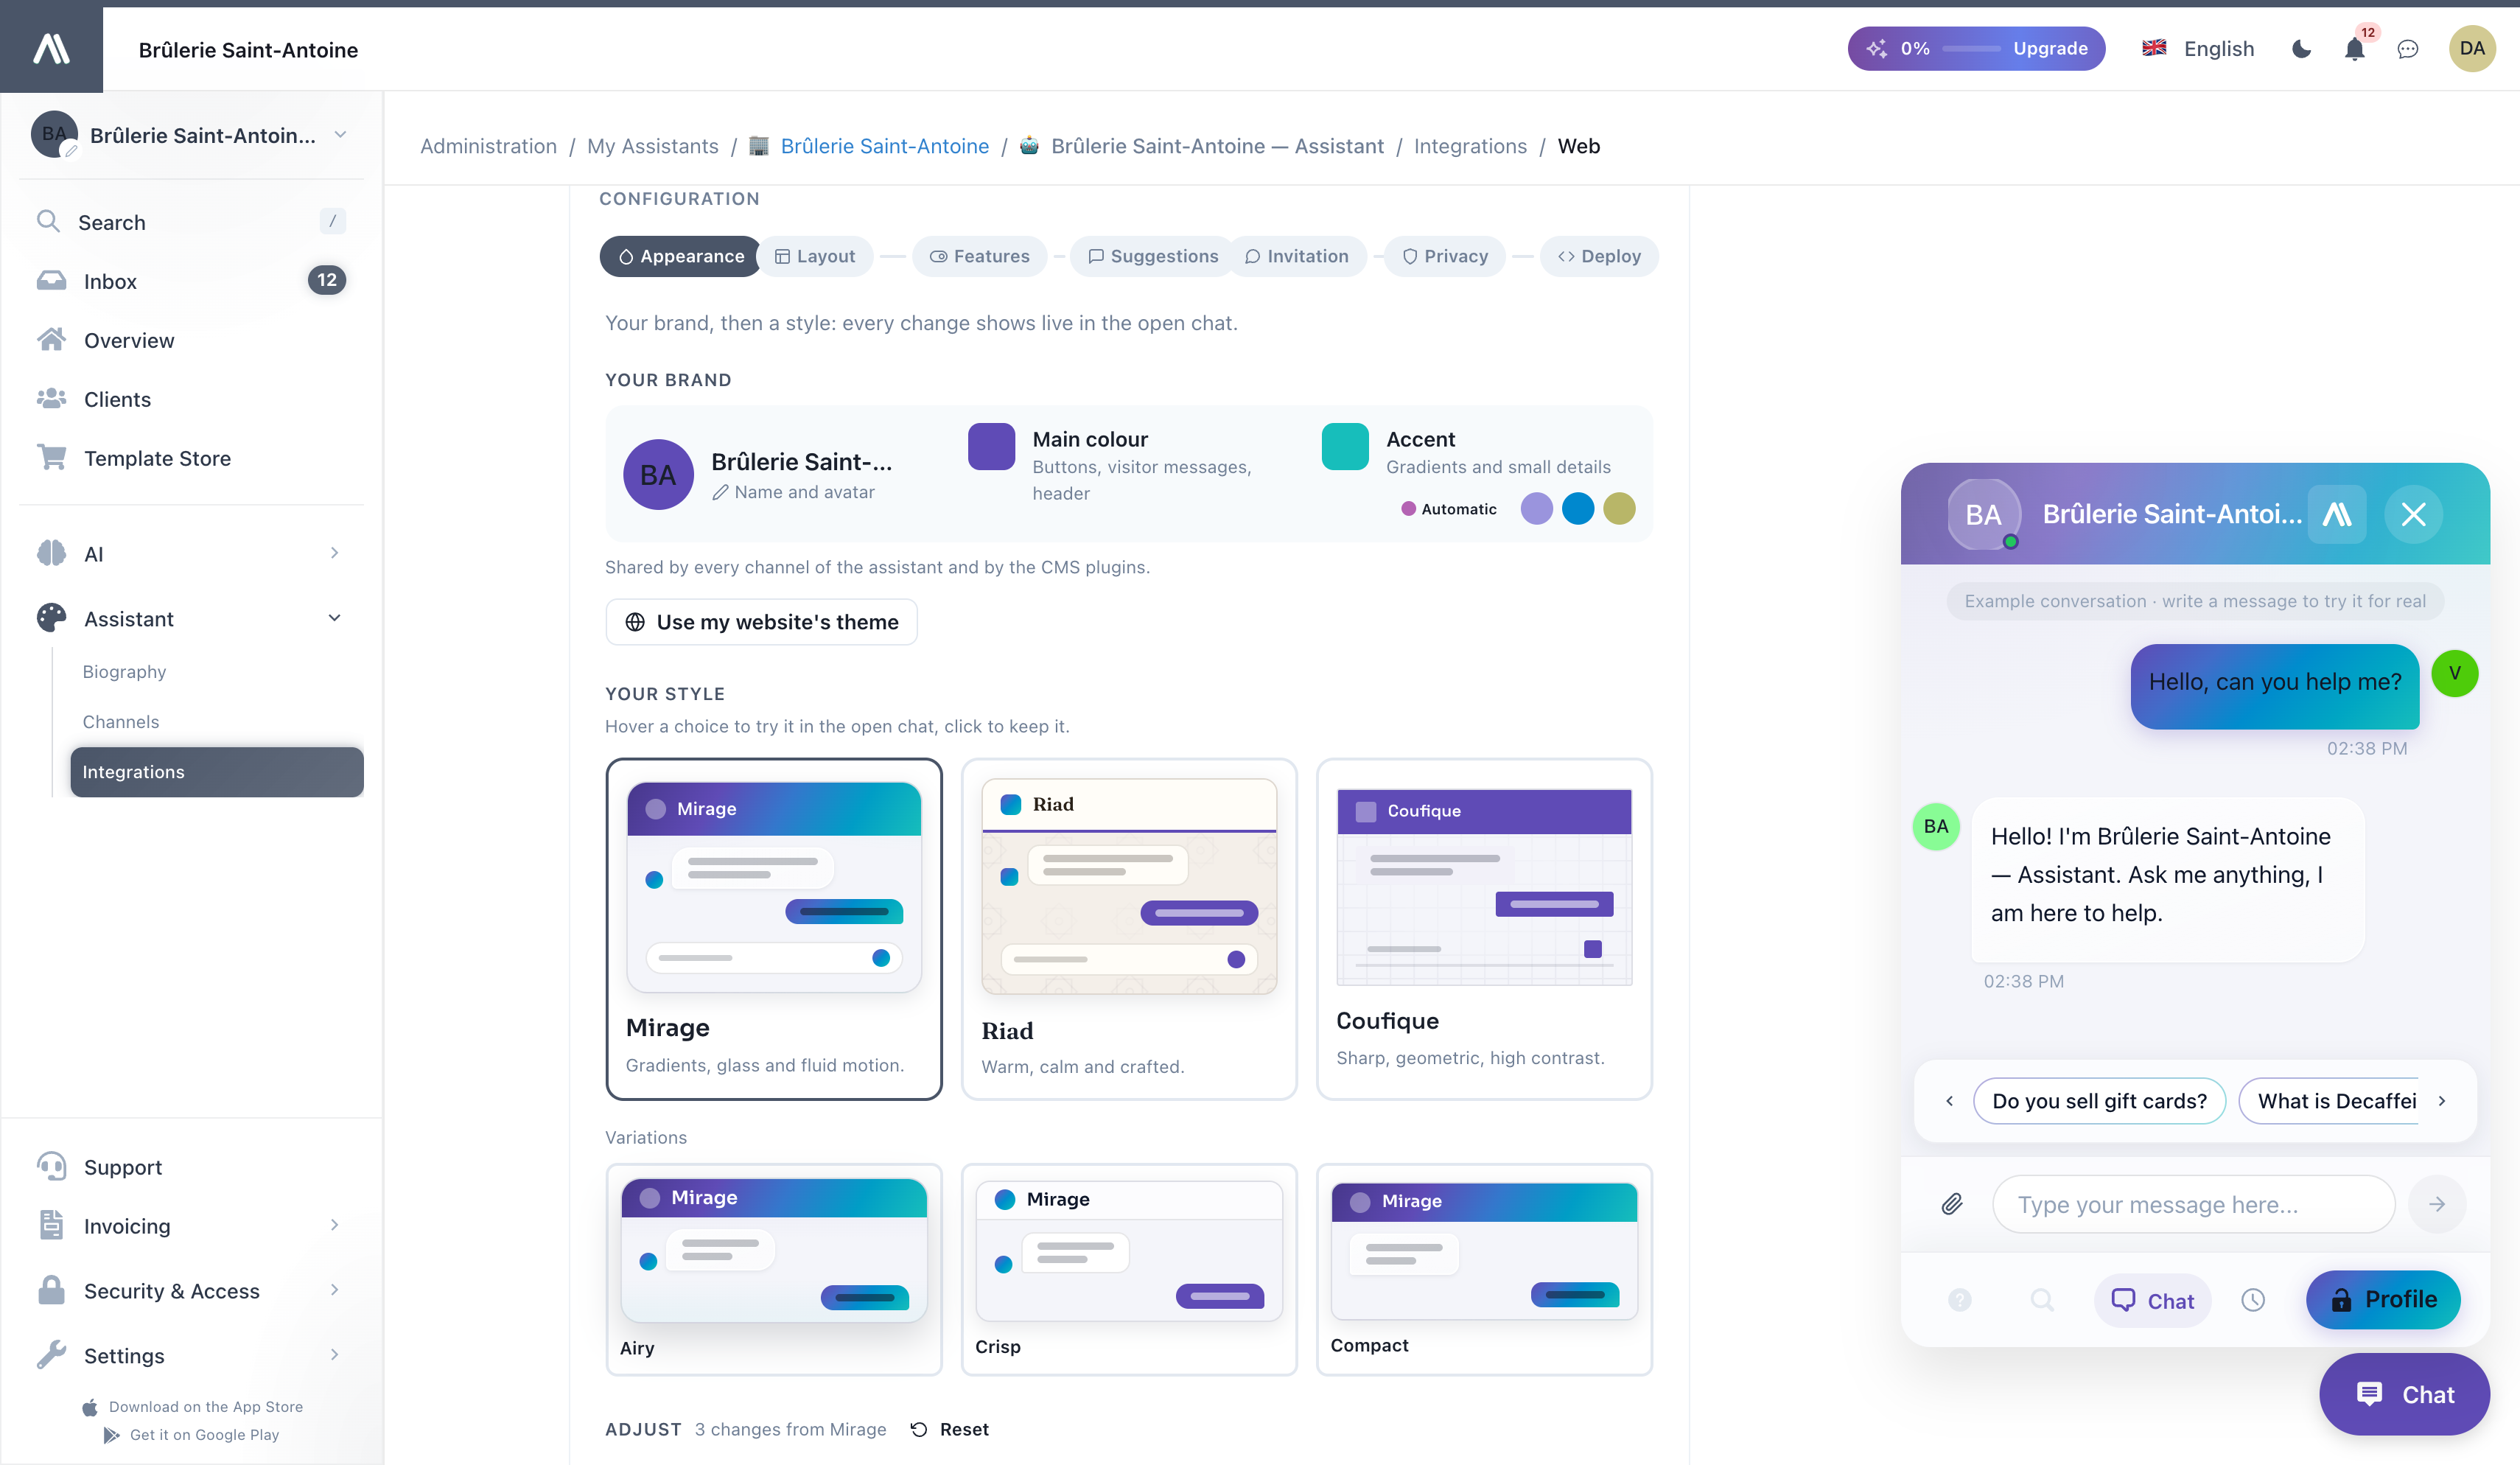
Your brand (name, avatar, main colour and accent), then a style: Mirage, Riad or Coufique, a variation, and any adjustment. Hover a choice to try it in the open chat, click to keep it. See Theme & Appearance for every option.
2. Layout
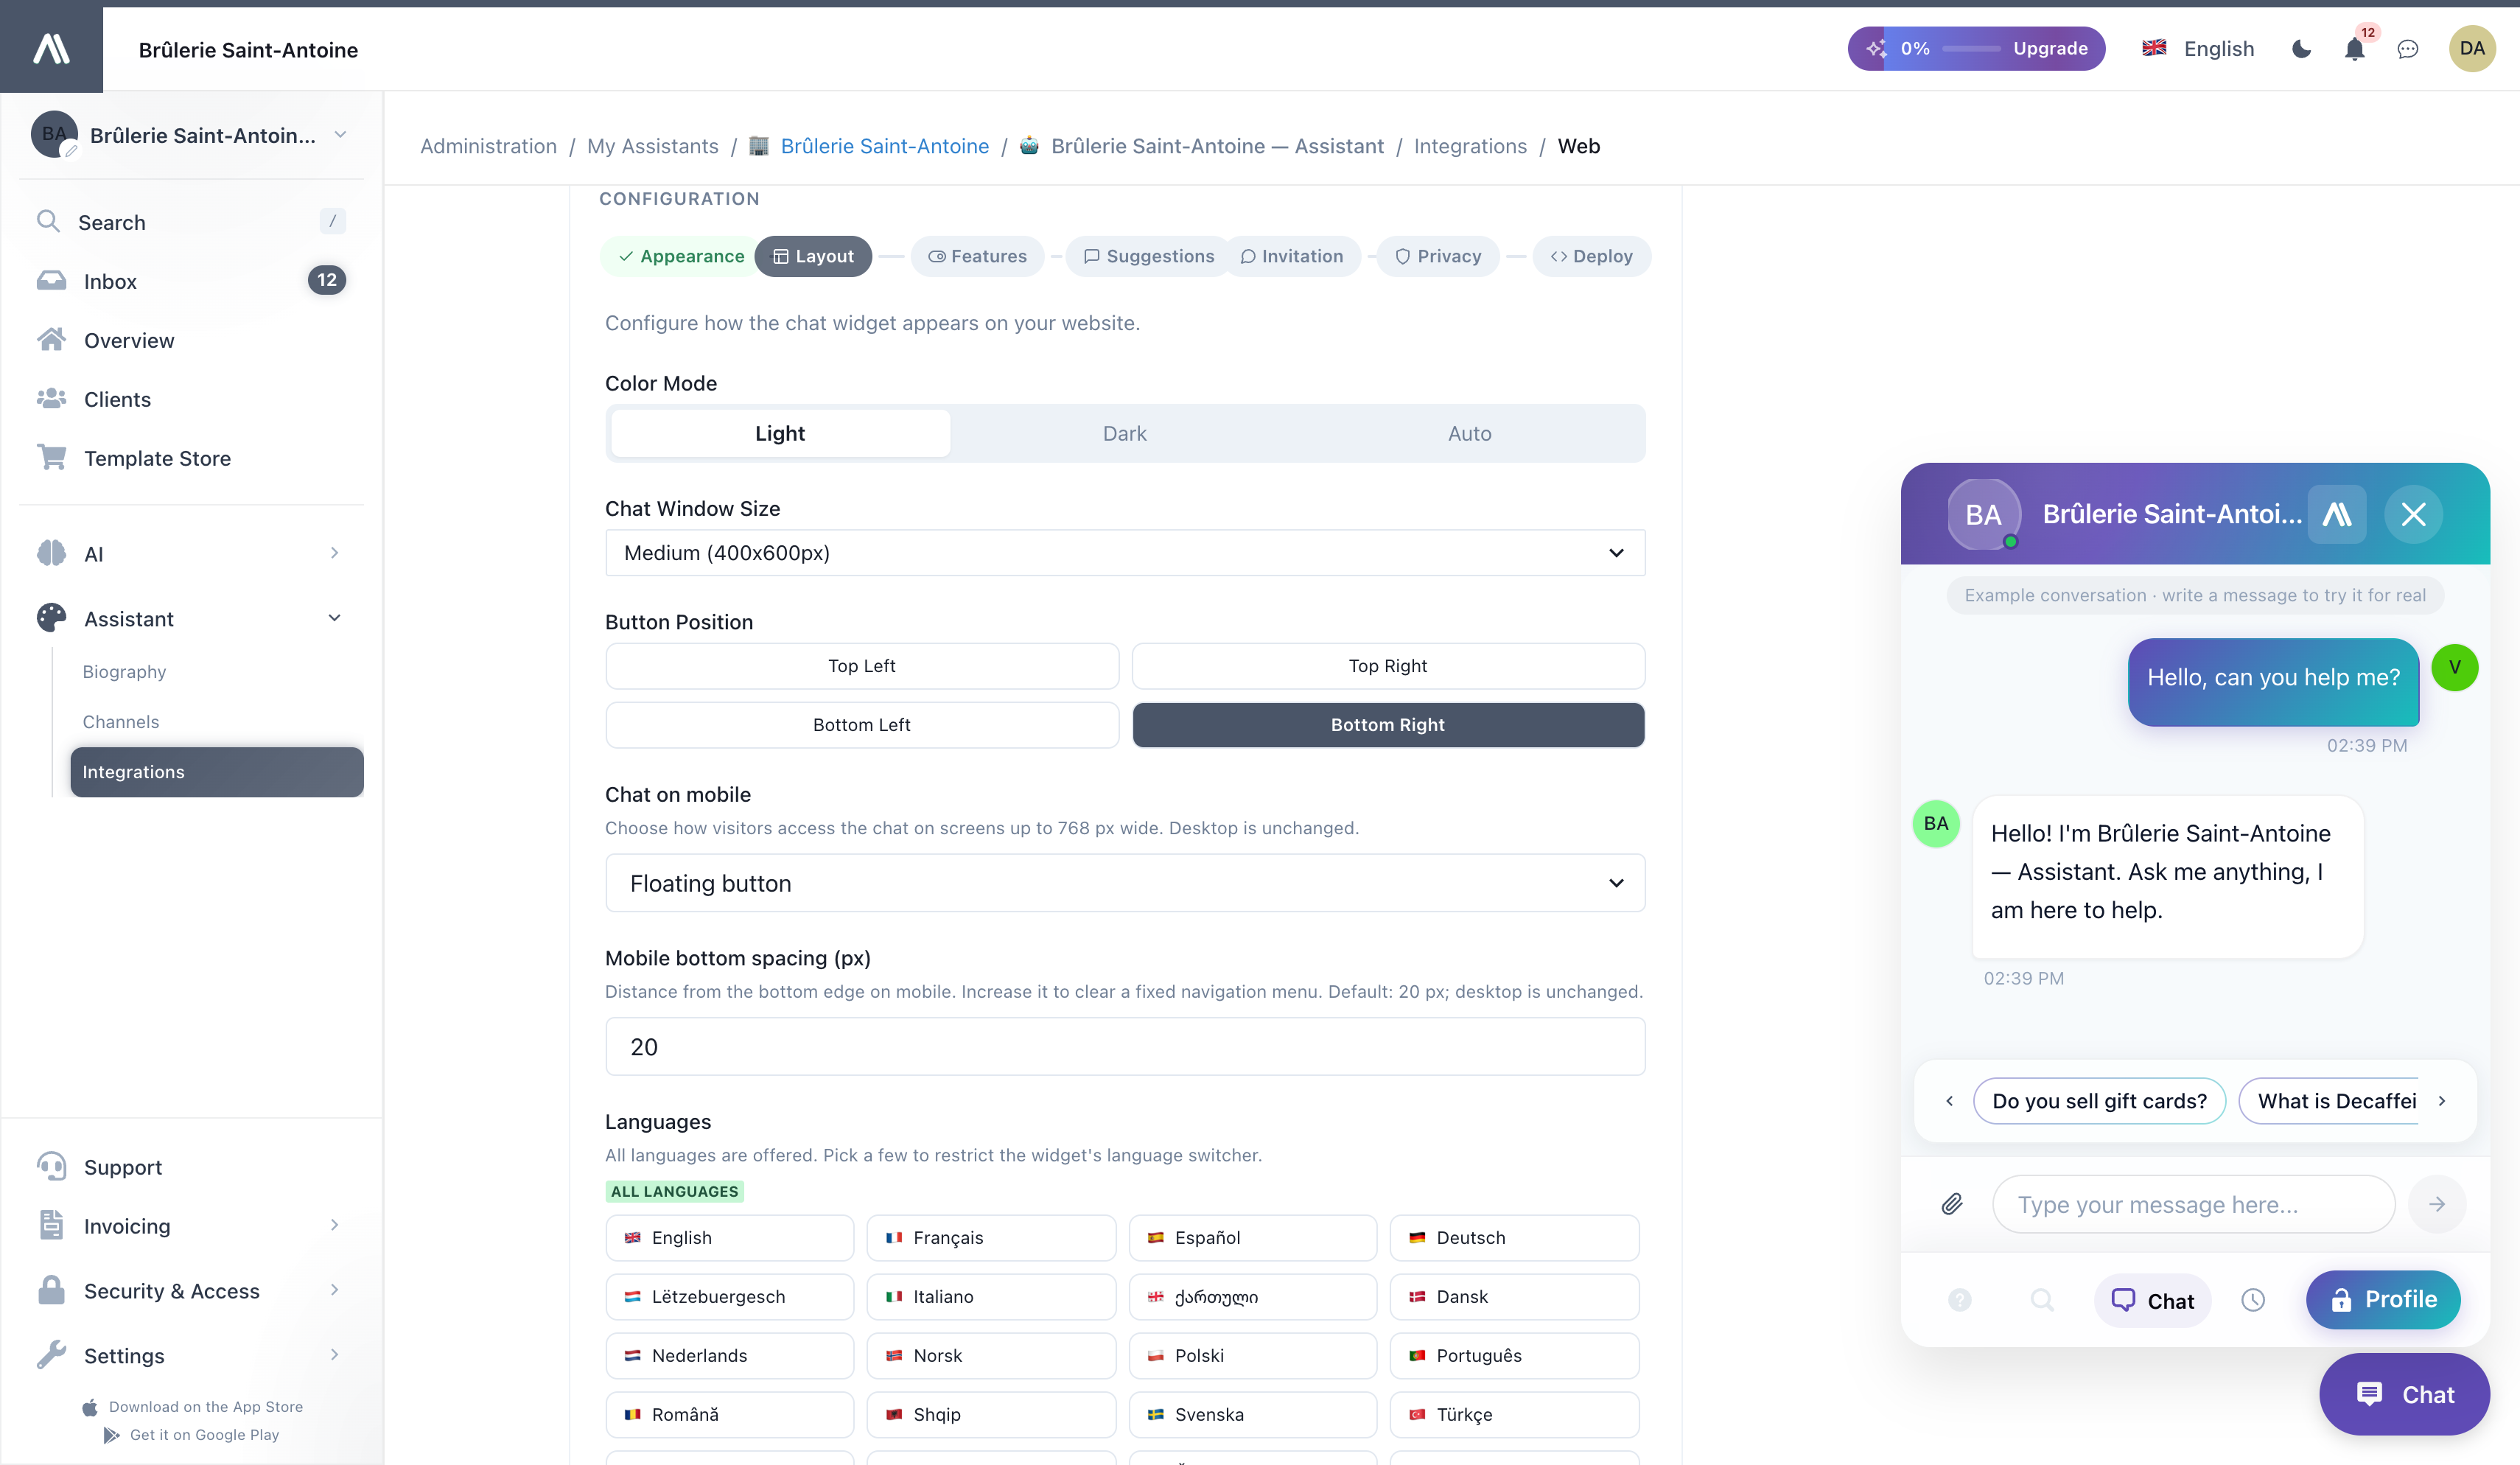
- Color Mode: Light, Dark, or Auto to follow the visitor's system.
- Chat Window Size and Button Position (any corner).
- Chat on mobile: a floating button, a button of your own site (any element with
data-aismarttalk-openopens the chat), or no chat on mobile. - Mobile bottom spacing: raise the button above a fixed menu at the bottom of your mobile site.
- Languages: all languages are offered by default; pick a few to restrict the widget's language switcher.
3. Features
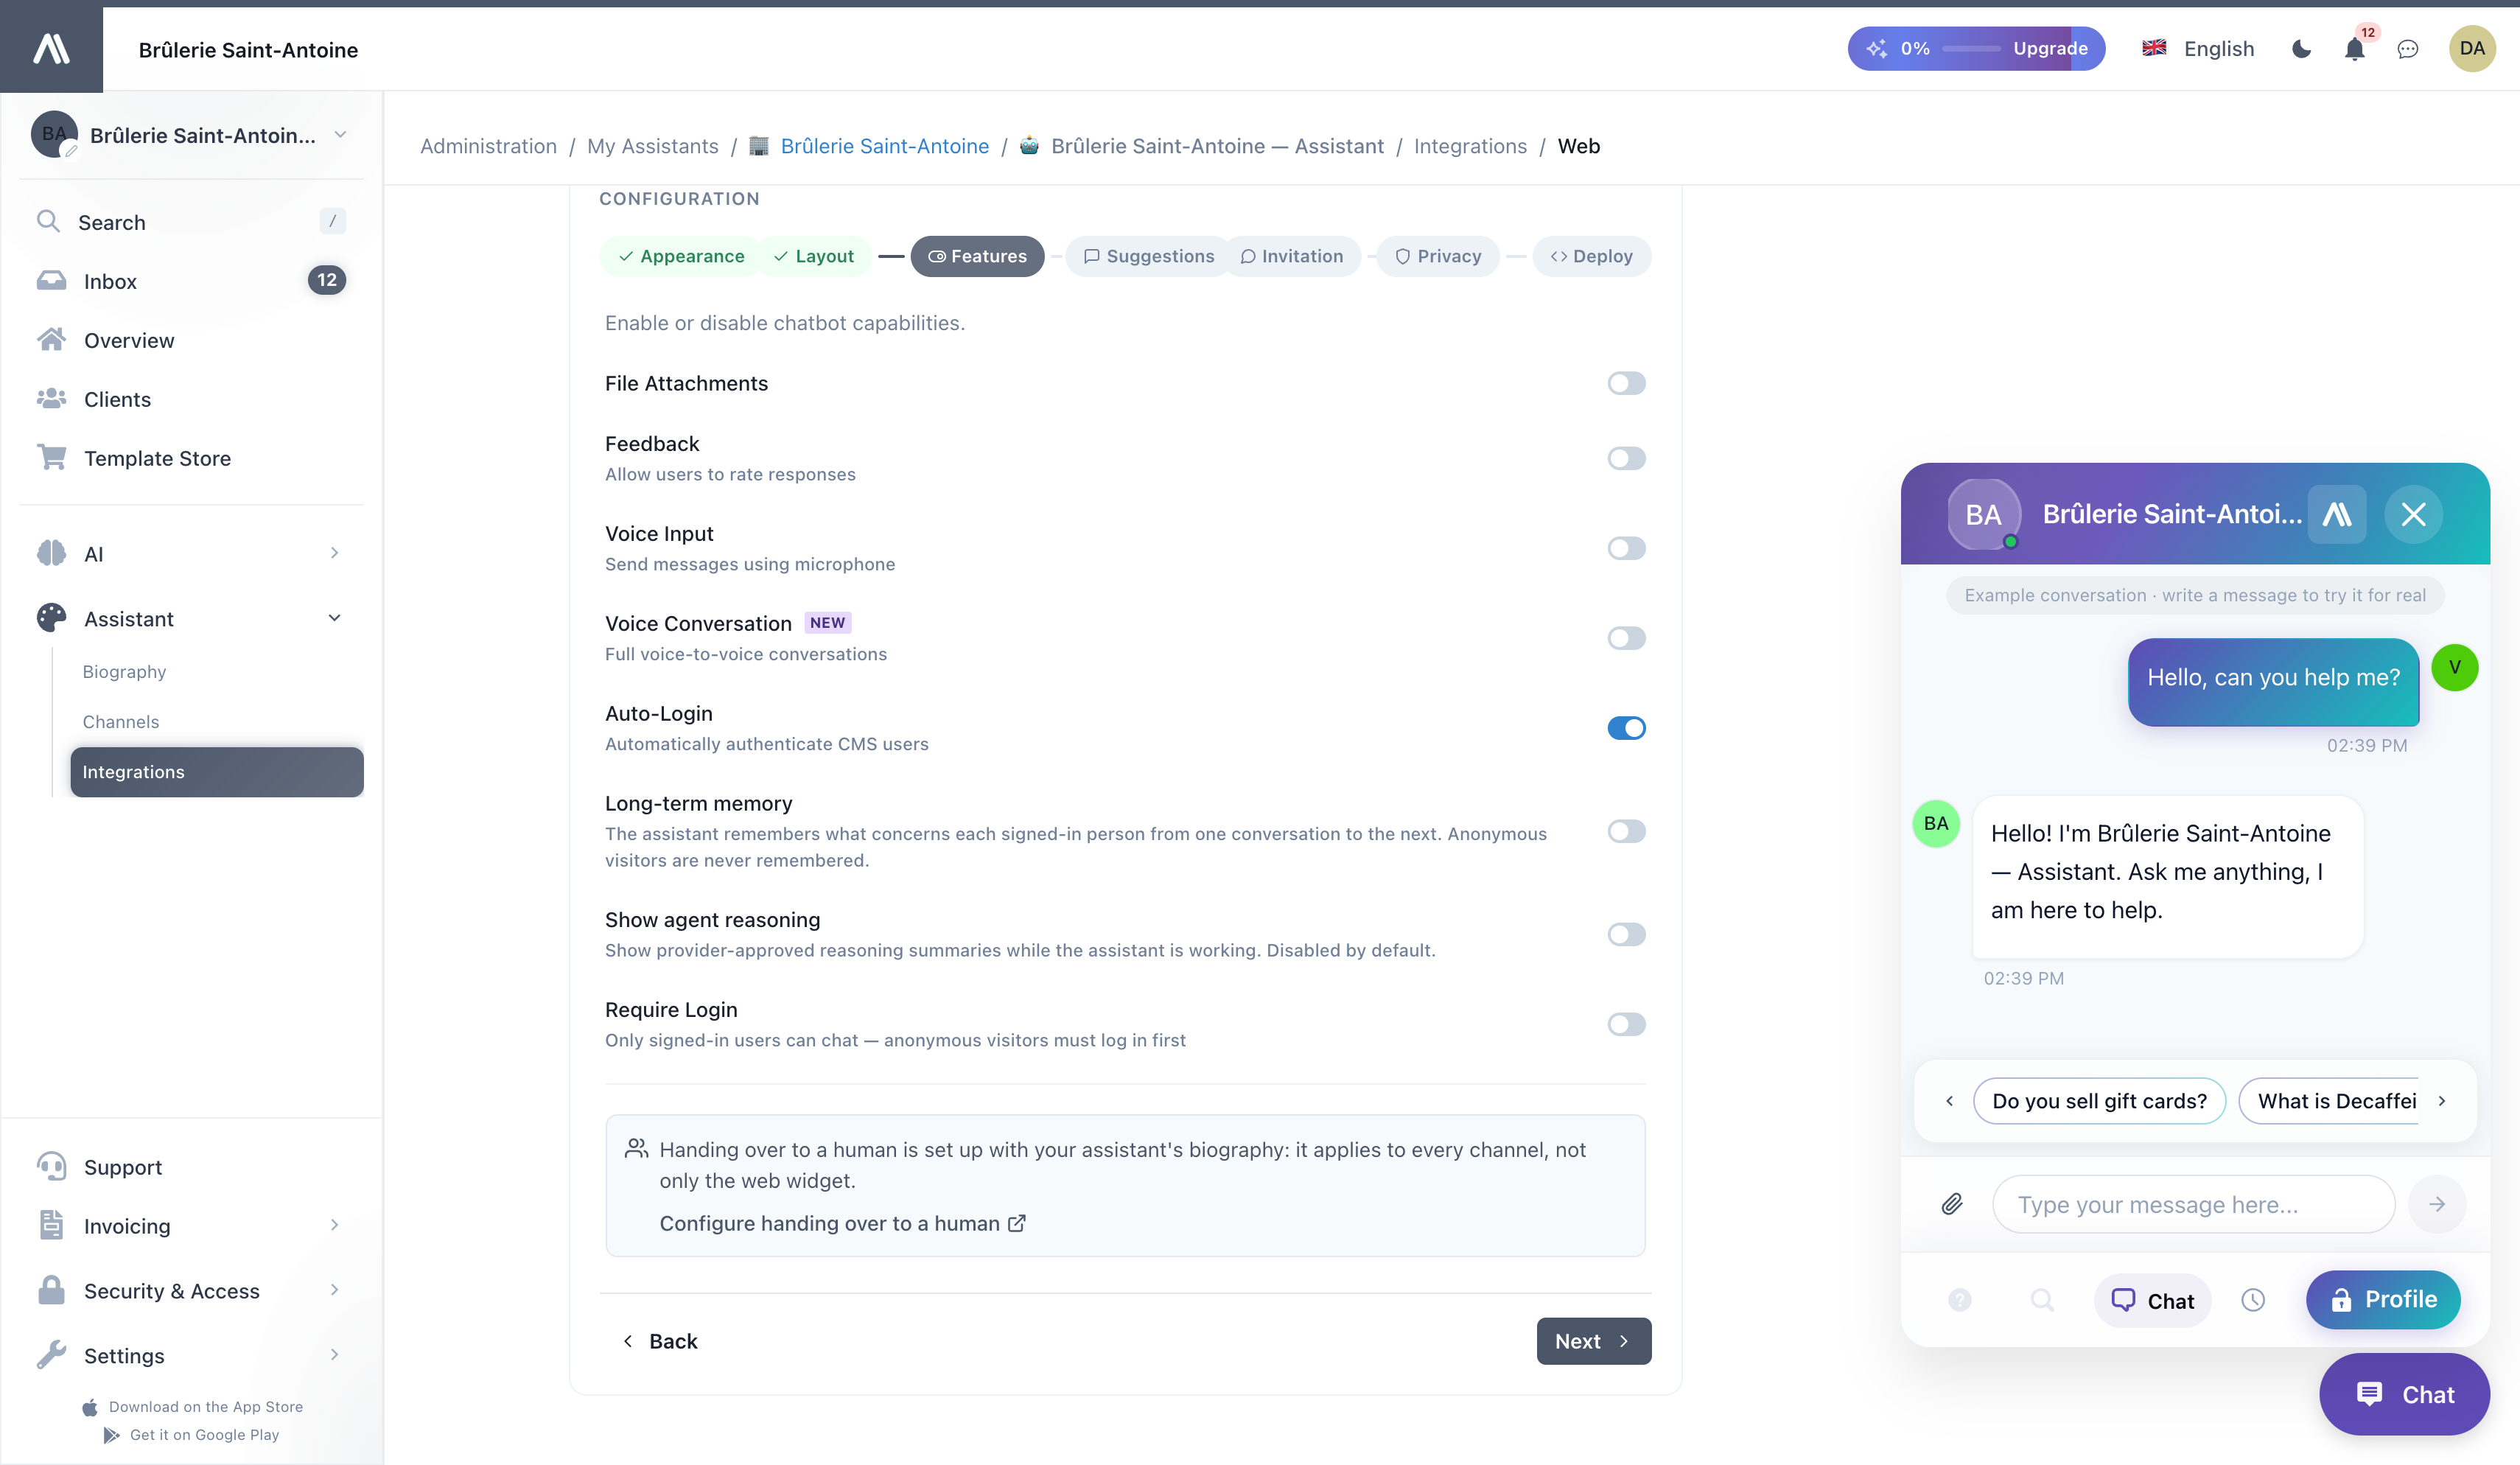
Turn each capability on or off: file attachments, feedback on answers, voice input, voice conversation, automatic sign-in for logged-in visitors of your CMS, long-term memory, showing the assistant's reasoning, and requiring visitors to log in.
Voice input is available from the very first message: a visitor can speak instead of typing before anything has been written.
4. Suggestions
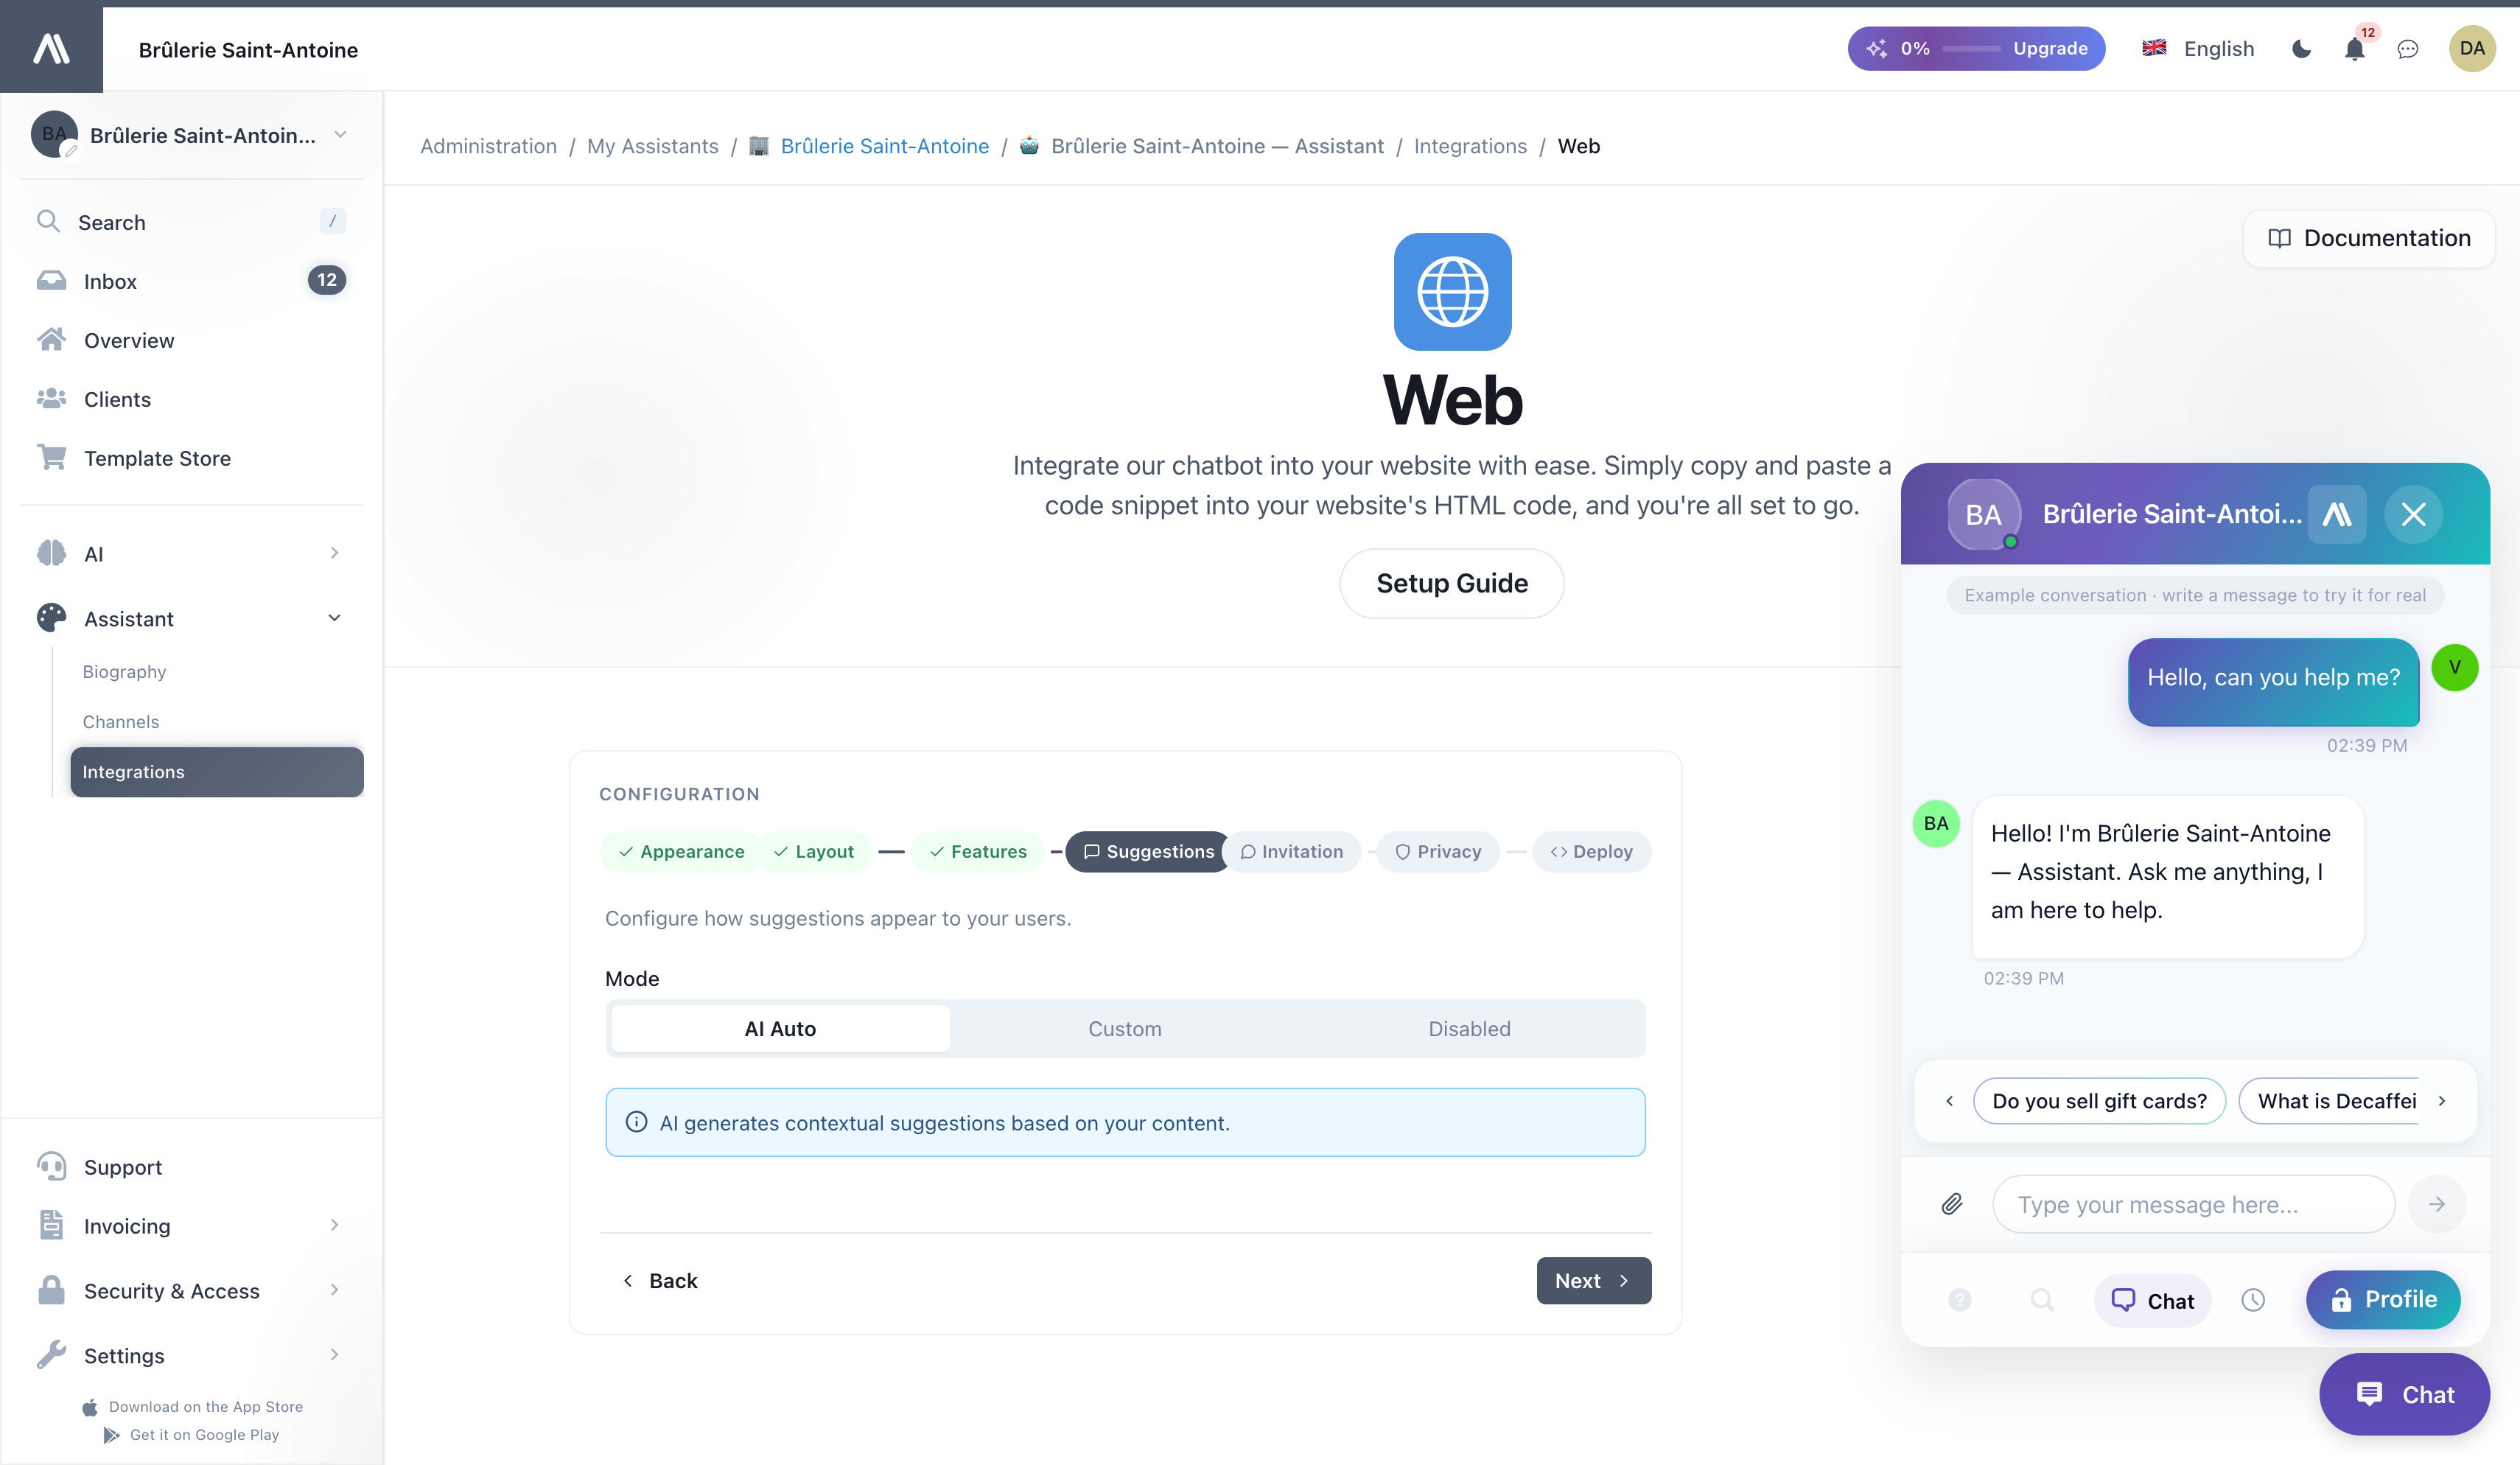
The questions offered to visitors above the message field: generated by the AI from your content (AI Auto), written by you (Custom), or Disabled.
5. Invitation
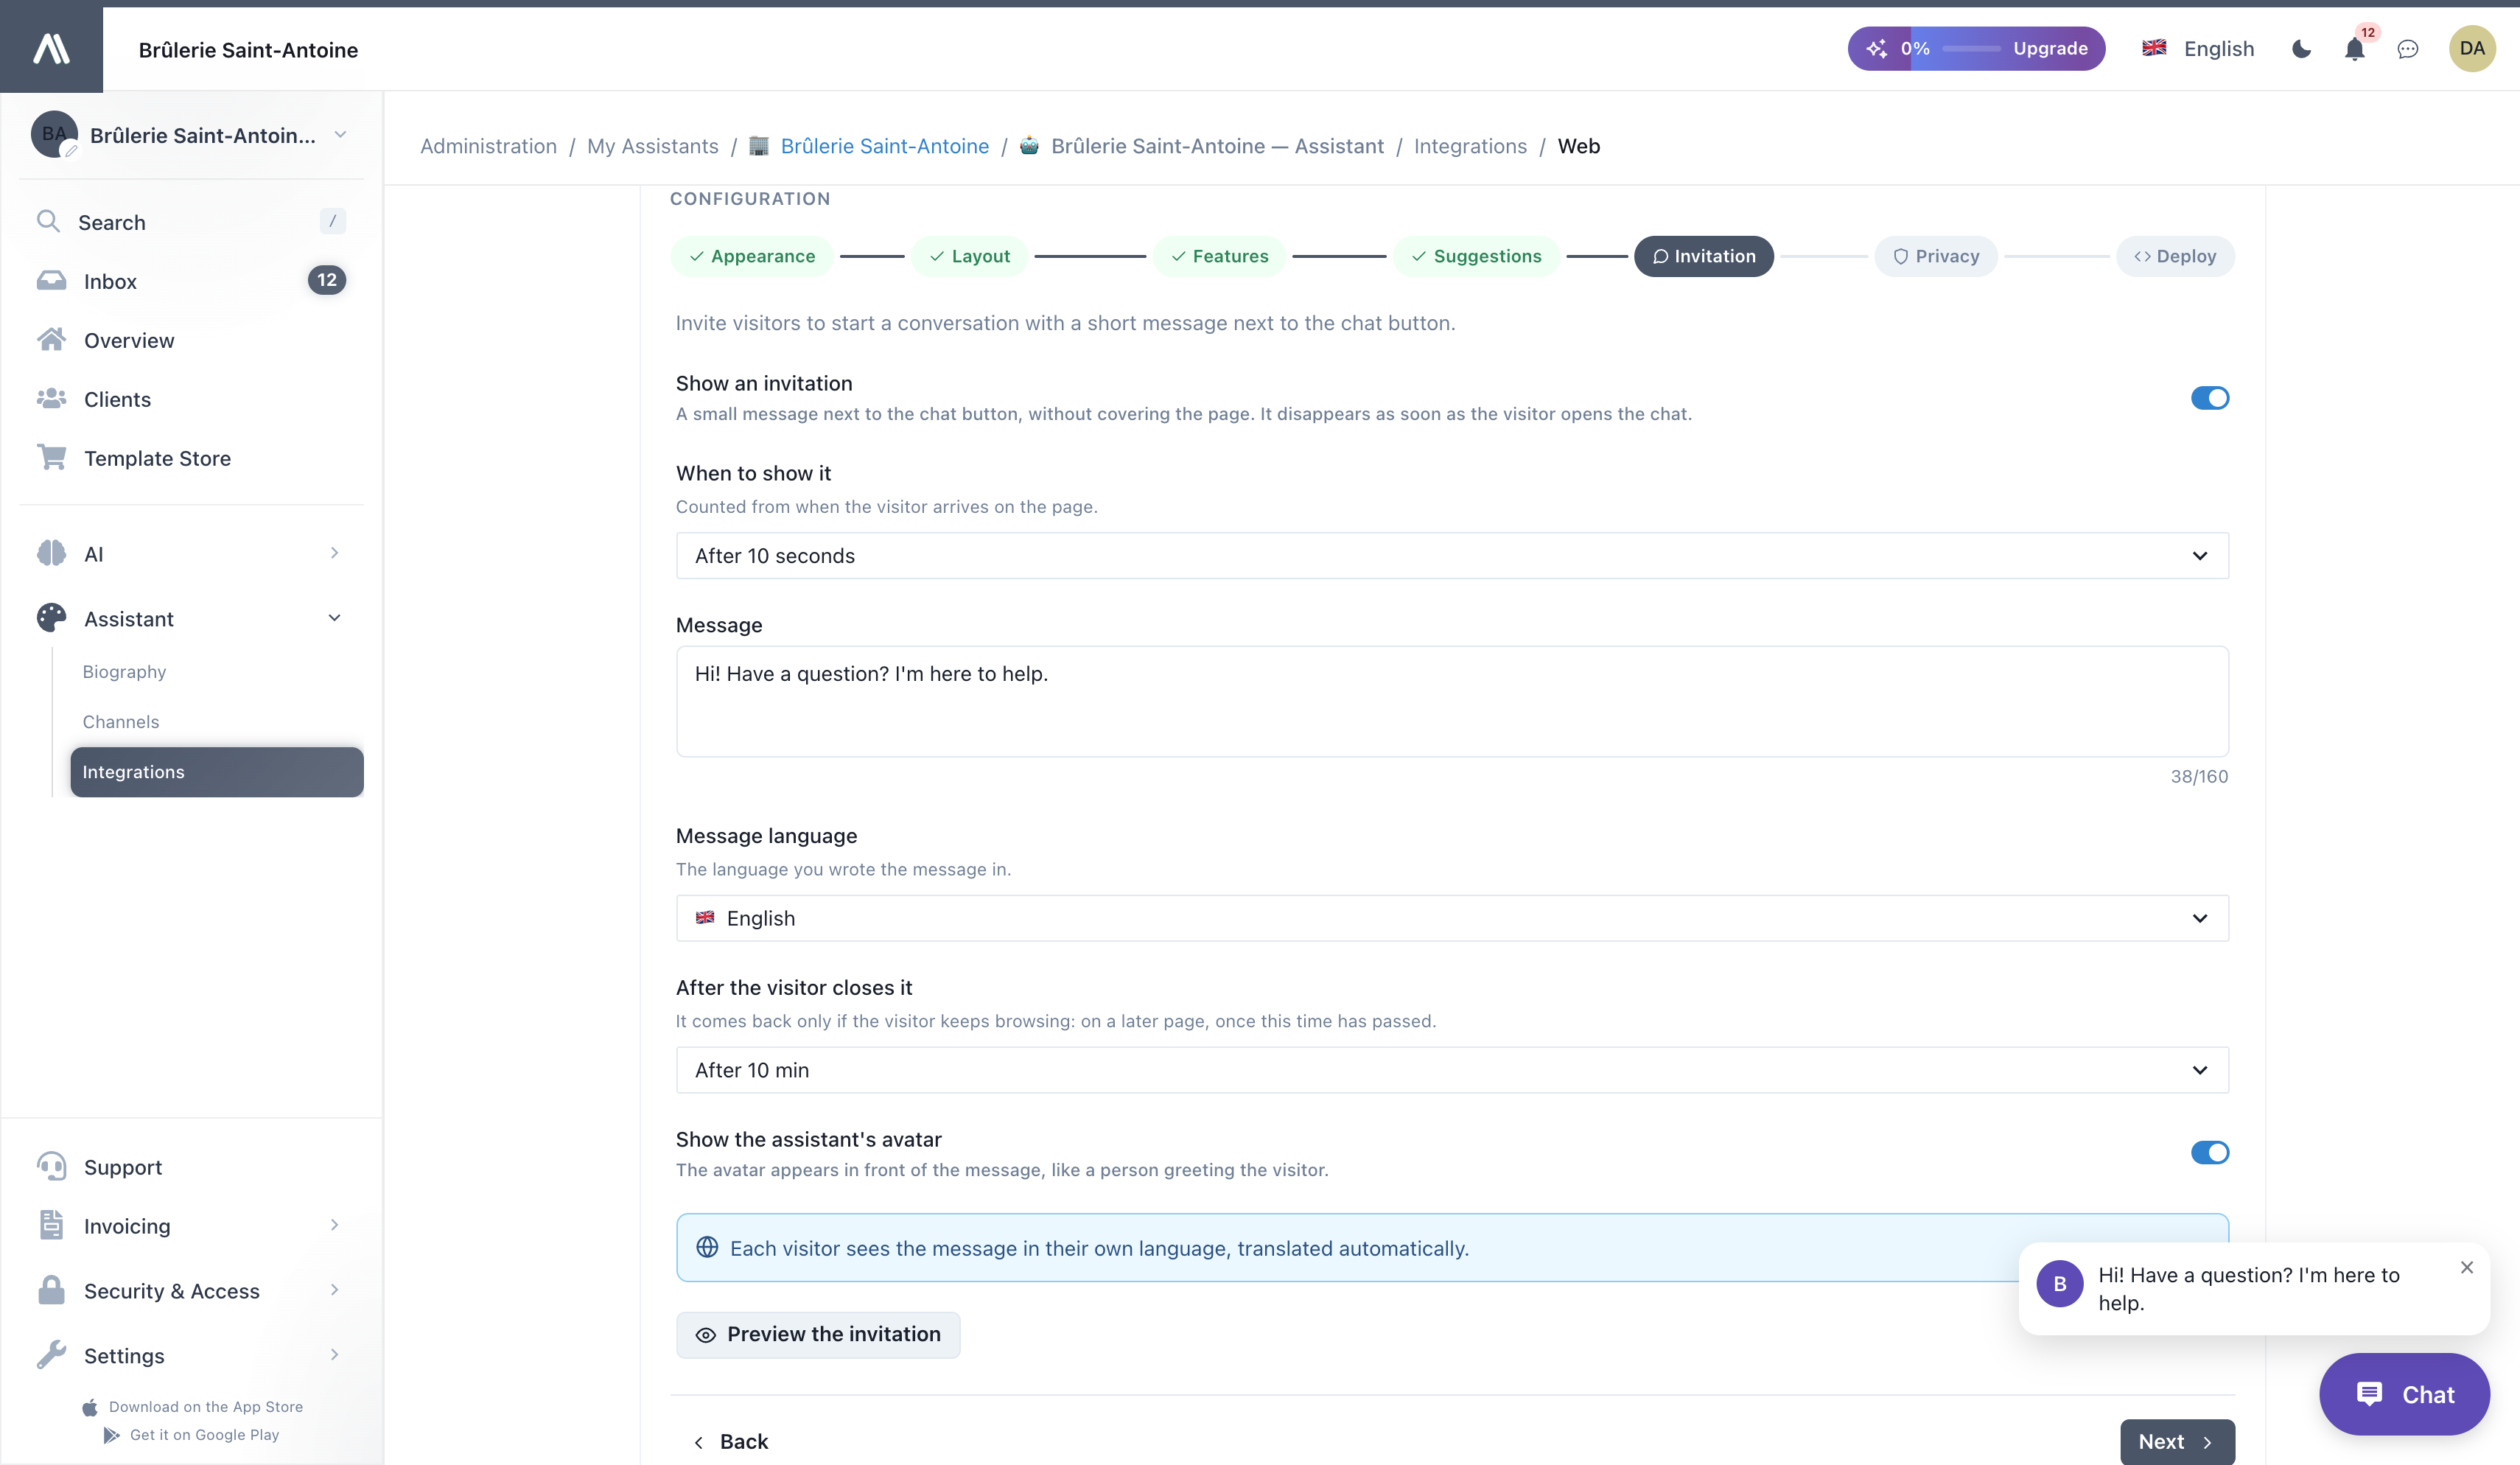
A short message next to the chat button, with your assistant's avatar, invites visitors to start a conversation without covering the page.
- When to show it: immediately, or after a few seconds or minutes on the page.
- Message: up to 160 characters. Each visitor sees it in their own language, translated automatically from the message language you wrote it in.
- After the visitor closes it: it never comes back during the visit, or comes back on a later page once the delay has passed.
- It disappears as soon as the visitor opens the chat.
Click Preview the invitation to see it on the page.
6. Privacy
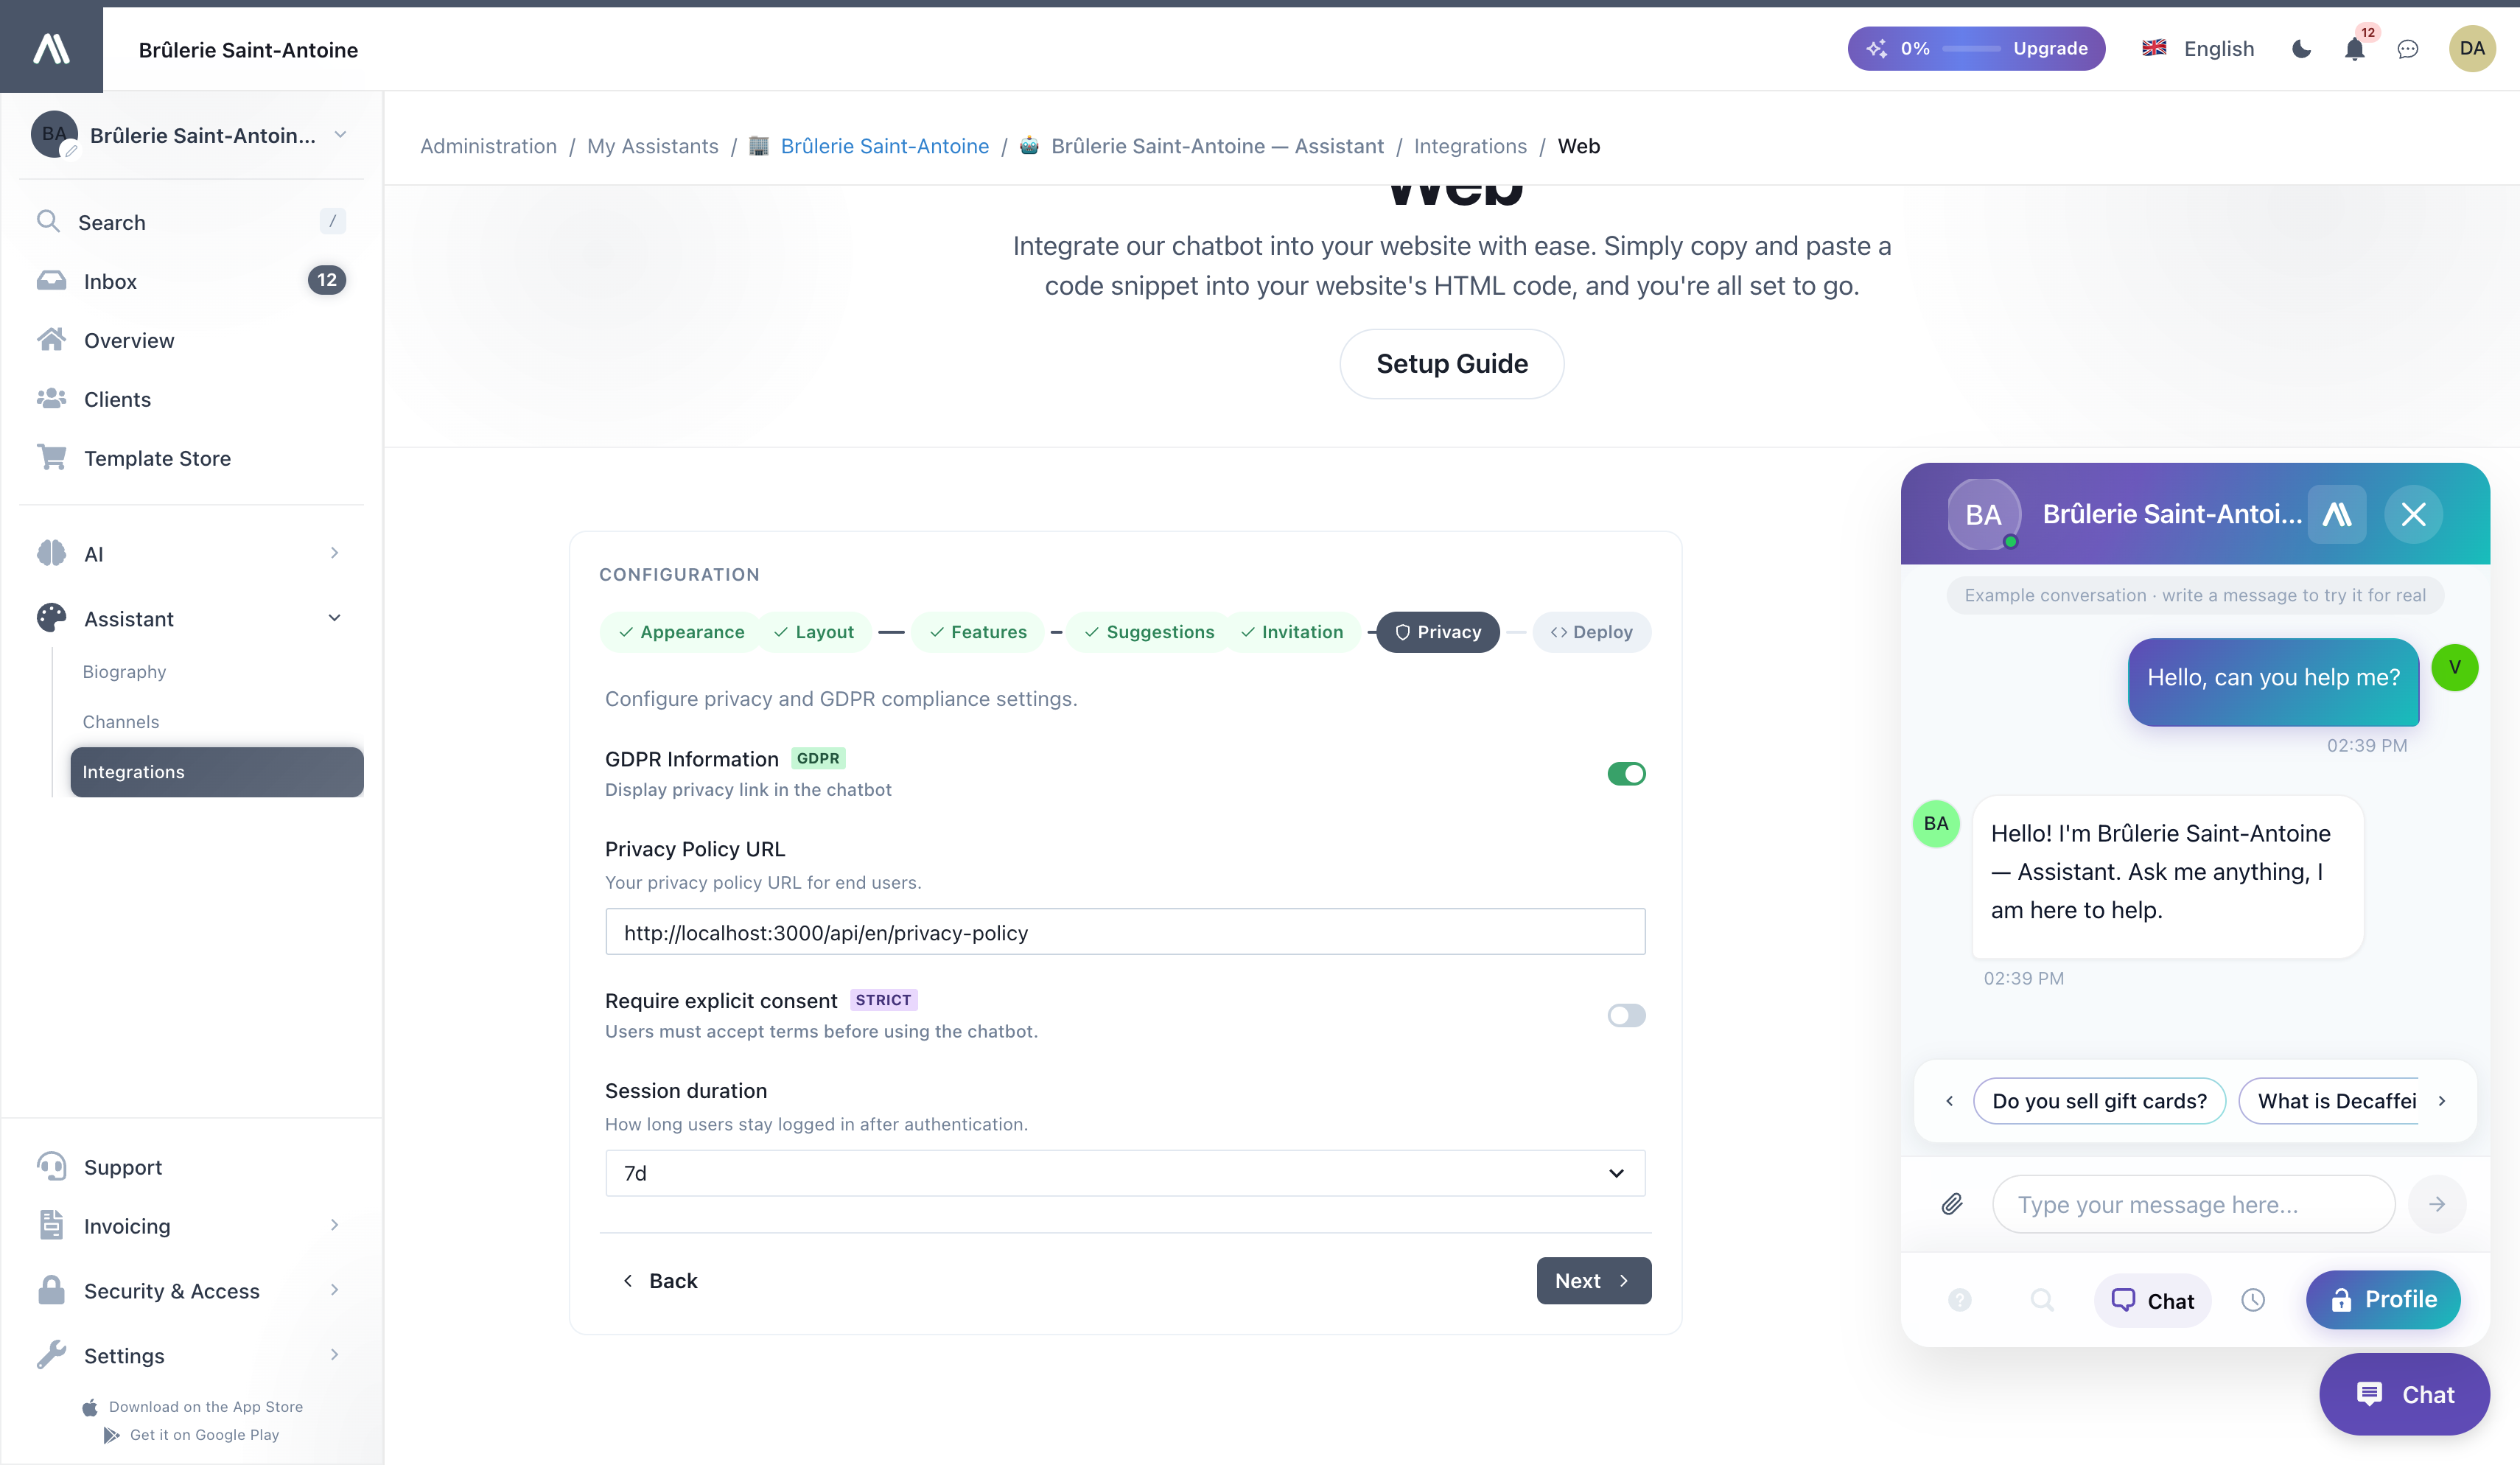
GDPR information shown to visitors, the link to your privacy policy, explicit consent before the chat can be used, and how long a session stays open.
7. Deploy
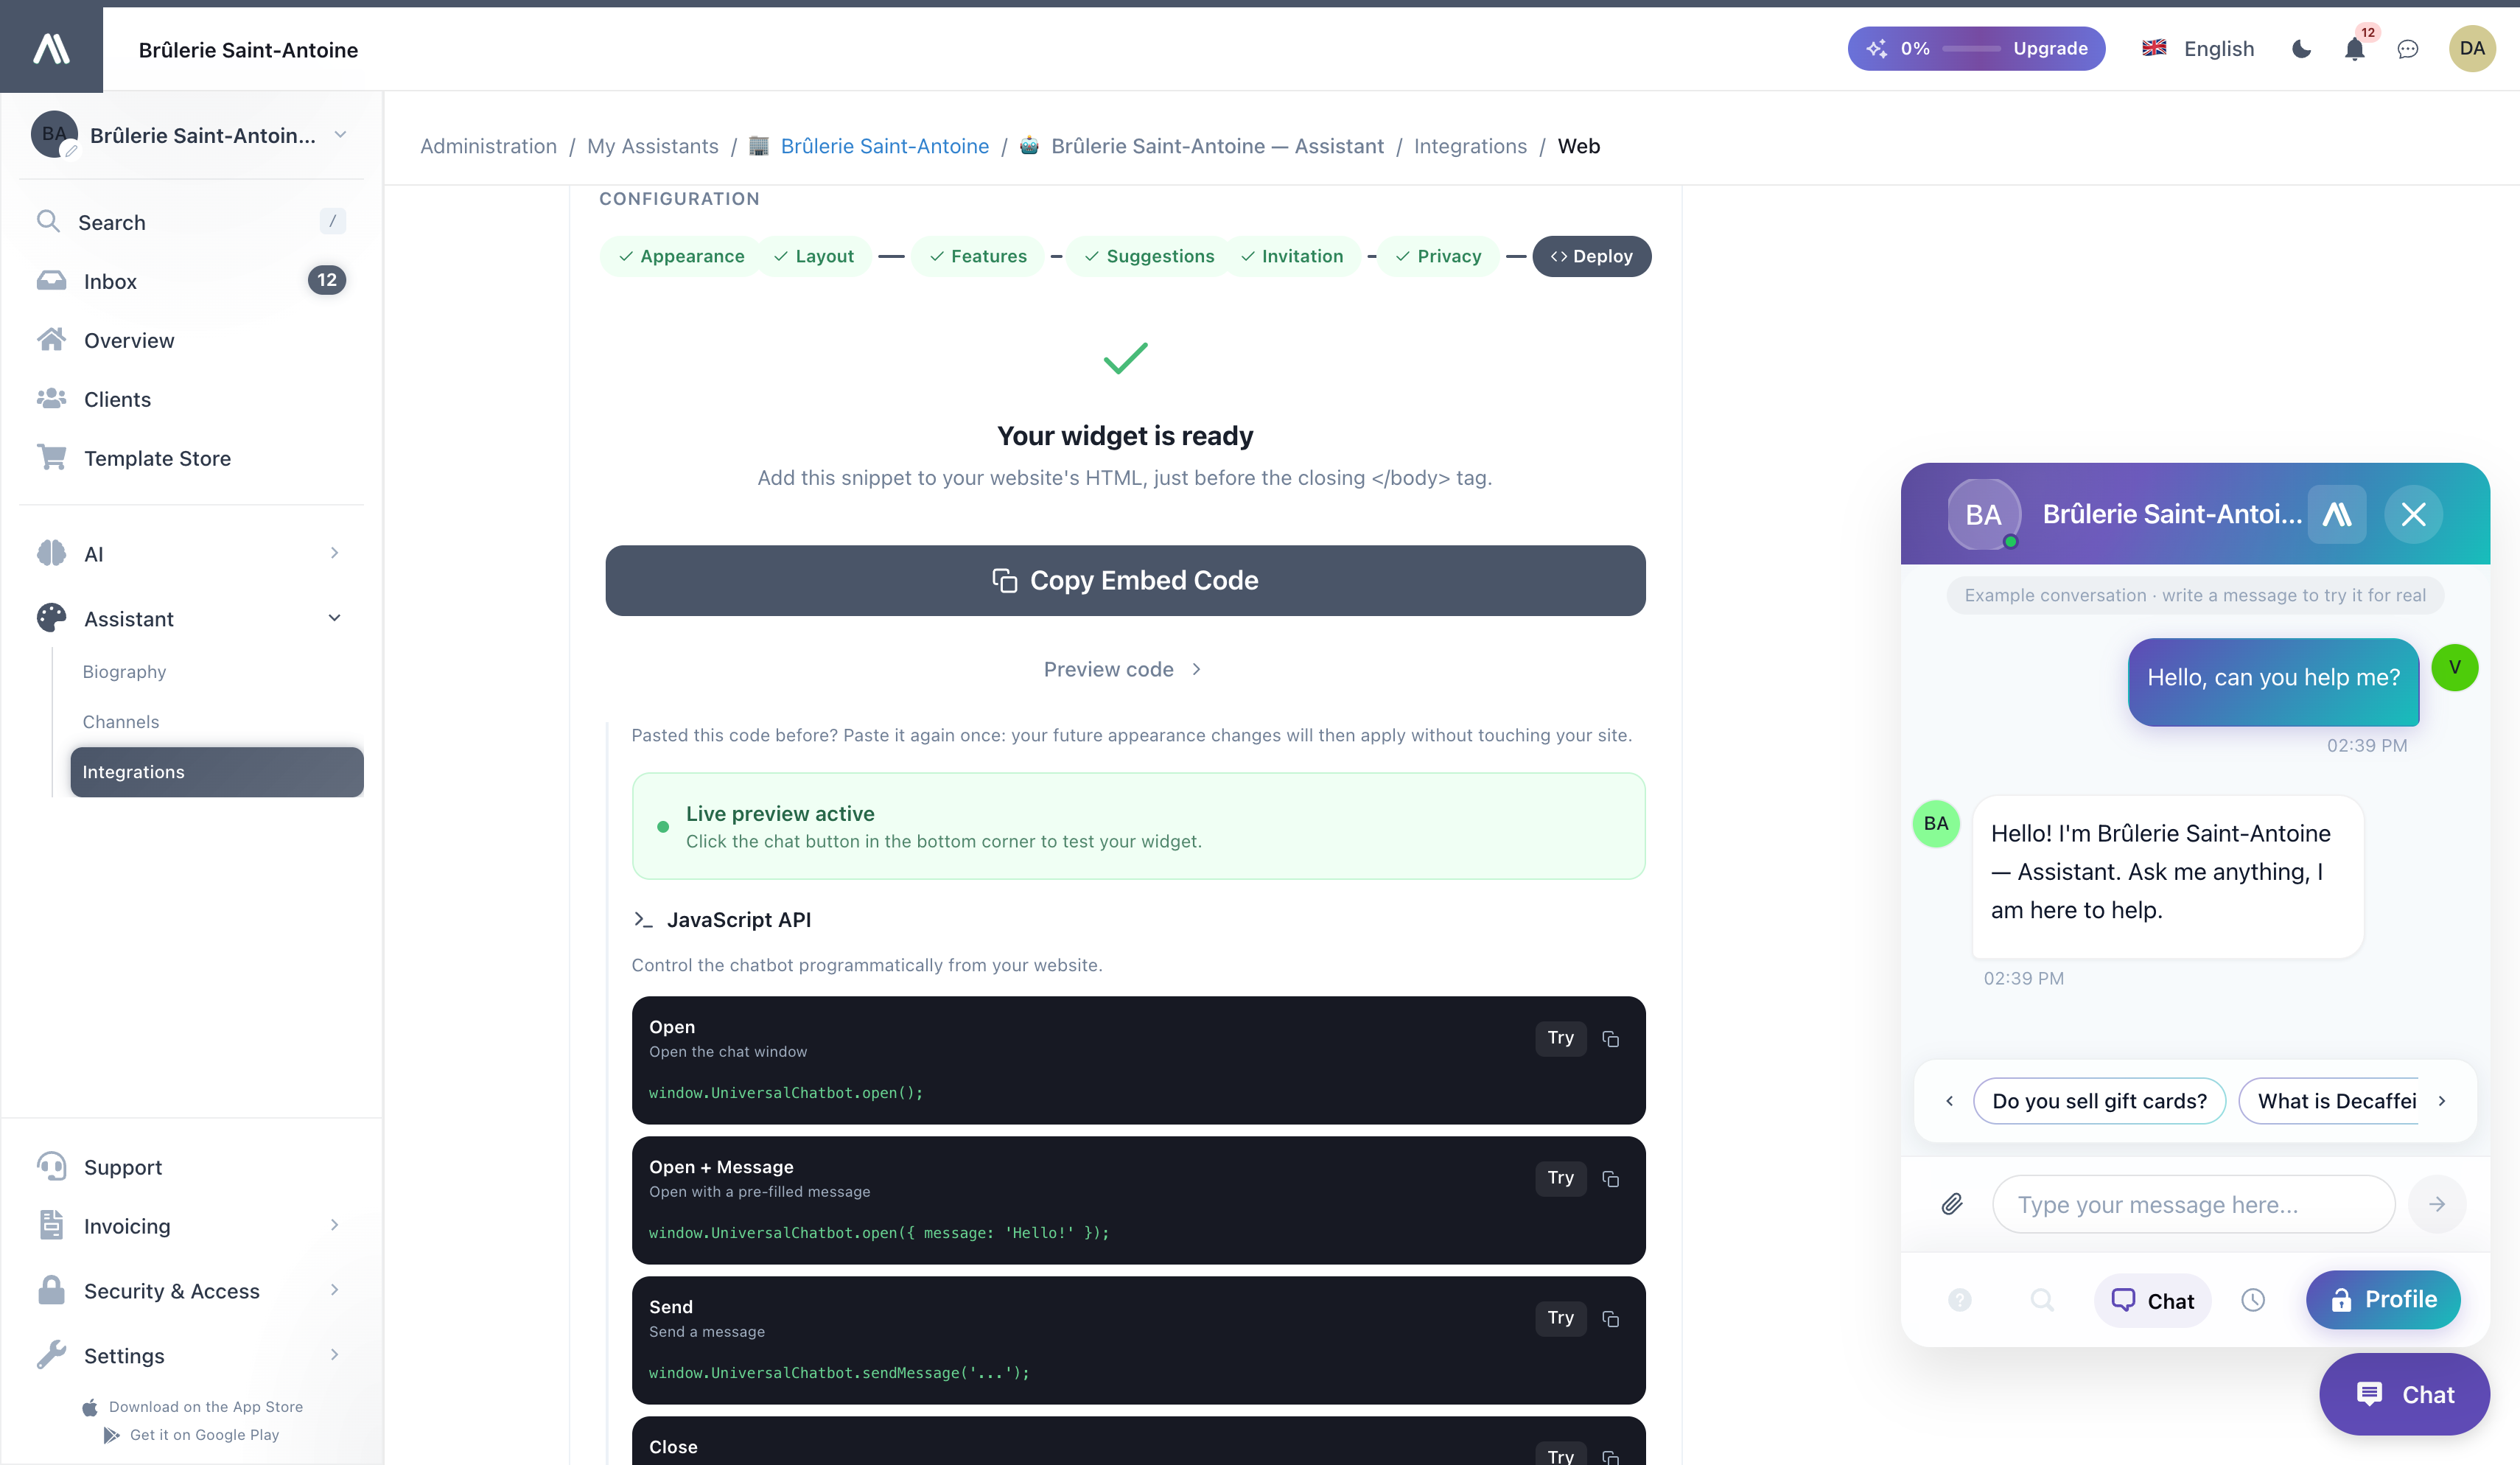
- Click Copy Embed Code.
- Paste it before the closing
</body>tag of your site's HTML — once, on any page template you want the widget to appear.
The widget shows up on the next page load. No build step, no NPM install.
Pasted the code before the styles existed? Paste it once more. Your future appearance changes will then apply without touching your site.
The JavaScript API at the bottom of the step lets your own buttons open the chat, open it with a pre-filled message, send a message or close it. Click Try to run each one on the preview.
Make it look right
The widget reads its colours, avatar, style and behaviour from your assistant's settings: there's nothing to configure in the snippet itself.
- Colours, avatar & style → Theme & Appearance
- Voice / tone → Biography
- What it can talk about → Knowledge Base
Change any of these and the widget updates everywhere it's installed, with no redeploy.
Lock it to your domains
Anyone could in theory paste your snippet on their own site and use your assistant's quota. Stop that by listing your domains:
- Go to Configuration → Allowed Domains.
- Add every domain where the snippet should work (e.g.
https://yoursite.com,https://staging.yoursite.com). - Save.
Requests from any other domain are rejected. This is also a requirement before going to production.
Multiple sites, one assistant
Paste the same snippet on as many sites as you want: they all share the same assistant, same knowledge base, same conversation history. Just remember to whitelist each domain in Allowed Domains.
Common problems
| Symptom | Likely cause |
|---|---|
| Widget doesn't appear | Snippet not before </body>, or your site has a content-blocker / strict CSP |
| Widget appears but won't open | Domain not in Allowed Domains |
| The preview says Your assistant is not answering visitors | The message gives the real reason (billing, AI credits, subscription…) and a link to fix it. Visitors only see that the chat is temporarily unavailable |
| Old colours on your site after a change | Your site still has an old snippet: paste the code from the Deploy step once more. Otherwise, a heavily cached page: try a hard refresh |
| Visitors get a "blocked" error | Their IP / browser was banned from the Inbox — check Inbox → Ban list |
Related
- Web Chat channel: what the widget can do for visitors
- Theme & Appearance: colours, avatar, name, style
- All integrations: plugins for WordPress / PrestaShop / Shopify / Joomla / Webflow
- Access Control: who can edit the integration